 Imagine this scenario: you are driving your car on a hot summer’s day. You reach for the air con button… and the very first blast makes your nose wrinkle in disgust.
That does not mean that it’s time to get a new car air freshener. It means that it is time to change your cabin air filter.
The job of this filter is to purify the air by trapping pollen, bacteria, dust and exhaust gases that find their way into a car’s air conditioning and heating and ventilation systems.The filter has an important health-related role because it improves the quality of the air you and your passengers breathe. It is also important for the smooth functioning of the car. A dirty cabin air filter makes your air conditioner work harder, putting pressure on your engine.
Being so important, it’s astonishing that so many drivers don’t know that they need to change their car cabin filter (or that they even have it).
The good news is, replacing this filter is relatively easy. If you have a trace of DYI talent in your fingers, you should be able to do it in about 15 minutes. Follow these steps:
- When buying a new cabin air filter, make sure it is suitable for your vehicle. You also need to know that there are two types of filters: the particulate and the activated charcoal. The particulate filter keeps out dust, bacteria, mould spores, pollen and other pollutants. The activated charcoal does all of that, and it also stops harmful gasses and odours. The activated charcoal is also more expensive.
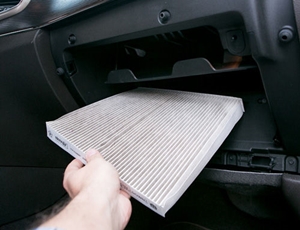
- Read the car’s manual to find out where the cabin air filter is located. Typically, it is found behind the glove compartment, but can also be under the dashboard on the passenger’s side of the car or under thebonnet (that last one might be too much for you; in that case, seek professional help).
- Open the relevant compartment and remove the filter slowly and carefully. More likely than not, it will be plastered with old leaves, twigs, insects, soot and grime that youdon’t want to scatter all over the inside of your car.As you remove the old filter, note which way the arrows are facing. This is important; to be on the safe side, take a photo with your phone.
- Clean the filter compartment with a vacuum cleaner and wipe it with a wet cloth. Check the condition of gaskets and seals to make sure they don’t need changing as well.
- Install the new cabin air filter. Check to make sure that the arrows on the new filter are pointing in the right direction. (Now is the time to refer to the photo you took.)
- Put everything back together the way it was.
- Record the date and mileage every time you change your cabin air filter, so you’ll know when it’s due for another change.
So, how often should you go through the steps above? Usually, you should change your cabin air filter once a year or every 20,000 to 25,000 kilometres, whichever comes first. However, it is best to check your car’s manual for manufacturer’s recommendation. Also, change the filter if you notice that the air flow has diminished or if there are persistent odours.
Oh, and don’t confuse the cabin air filter with the internal combustion air filter, which is often referred to as an air filter. The latter protects your engine, but that is a whole different story.


